


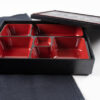
Designing consumer food storage containers requires balancing daily product utility with high-efficiency manufacturing parameters. The popular four-compartment bento box offers excellent consumer value by keeping main dishes, sides, and rice completely separated. Consequently, this multi-grid setup represents a highly profitable product line for houseware brands worldwide.
However, molding these deep-cavity divider walls presents serious challenges during mass production. Complex internal partitions often cause part distortion, severe sink marks, or ejection cracking if unoptimized. Therefore, mastering the engineering behind a 4-compartment bento box mold is vital to streamlining your factory output. This technical guide explores how to optimize divider geometries to ensure flawless, rapid part demolding.
1. Core Structural Elements of Multi-Compartment Bento Box Design
To manufacture a durable, visually appealing container, your product blueprint must follow strict thermodynamic and mechanical rules. Avoid random dimensioning by standardizing three critical geometric variables:
                  Essential Grid Geometry Parameters:
 ┌──────────────────────────────────────────────────────────────────────┐
 │ Uniform Wall Thickness: Keep dividers within 60-70% of base wall.   │
 │ Optimizing Rib Height: Maintain an ideal 3:1 height-to-width ratio.  │
 │ Ample Draft Angles: Integrate a 1.5° to 2.0° slope on all grids.    │
 └──────────────────────────────────────────────────────────────────────┘
Uniform Wall Thickness Across Partitions
Plastic shrinks naturally as it cools inside a steel cavity core. If your internal divider walls are thicker than the main outer base, the thick areas cool much slower. This uneven thermal cooling pulls the plastic inward, creating unsightly dimples on the smooth exterior face. Therefore, always design your internal grid dividers to be 60% to 70% of the nominal base wall thickness.
Proportional Grid Height and Base Thickness Relationships
Deep dividers allow users to pack larger food portions, but exceptionally tall walls create massive internal friction during demolding. Maintain a strict 3:1 ratio between the rib height and the base wall thickness wherever possible. This proportional control guarantees a rigid partition while executing high-volume thin wall injection molding cycles safely.
Optimizing Draft Angles for Frictionless Release
A zero-degree vertical wall creates a tight vacuum seal against the molding steel during the cooling phase. This intense suction forces the ejection system to push excessively hard, which warps the hot plastic container. To ensure an easy release, apply a consistent draft angle of $1.5^\circ$ to $2.0^\circ$ along every internal grid surface.
2. Common Injection Defects and Their Engineering Solutions
Even slight calculation errors in multi-gate tooling systems can introduce noticeable cosmetic and structural flaws. Use these proven engineering countermeasures to troubleshoot common manufacturing challenges:
 Problem A: Core Grid Sink Marks     ──> Fix: Extend Packing Time & Trim Rib Base Thick
 Problem B: Deep Divider Ejector Marks ──> Fix: Deploy Wide Ejector Blades & Optimize Layout
 Problem C: Sharp Grid Stress Cracks ──> Fix: Blend All Internal Intersections with Radii
Eliminating Grid Base Sink Marks
Heavy sink marks often appear directly beneath the internal intersection joints where the four grids meet. To resolve this defect, reduce the raw material volume at that specific junction point. Additionally, increase your machine’s packing pressure time to force extra molten plastic into the shrinking core zones during solidification.
Eradicating Ejector Marks and Whitening Patches
When thin ejector pins press against a sticky, deep-cavity grid wall, they leave ugly stress marks or punch clean through. Solve this problem by increasing the total number of ejection points across your tool layout. Swap out round pins for wide, flat ejector blades that distribute the physical lifting forces evenly across the divider rims.
Preventing Structural Stress Cracking at Sharp Corners
Sharp $90^\circ$ angles inside a tool block restrict the smooth flow of molten plastic and trap residual mechanical stress. These high-stress areas crack easily when consumers drop the finished container. To fix this vulnerability, blend every single internal corner with a generous radius transition to distribute impacts smoothly.
3. Advanced Tooling Strategies for Melamine and Premium Polymers
Processing premium materials requires utilizing advanced mold base configurations to guarantee a long tooling lifespan.
                  Premium Tableware Molding Tactics:
   ┌──────────────────────────────────────────────────────────────────┐
   │ High-Grade Steel Choice: Use mirror-polished H13 tool steel inserts.│
   ├──────────────────────────────────────────────────────────────────┤
   │ Multi-Point Hot Runners: Ensure balanced polymer flow to all grids. │
   ├──────────────────────────────────────────────────────────────────┤
   │ Independent Cooling Loops: Run dedicated channels inside core ribs.  │
   └──────────────────────────────────────────────────────────────────┘
When building a high-tier melamine tableware structural design, tool makers must account for the unique flow traits of thermoset resins. These dense materials require high curing temperatures and extreme packing pressures to fill deep pockets completely.
To maximize tool life, construct your primary cavity blocks from premium, mirror-polished H13 tool steel. Furthermore, route-independent water cooling channels are directly up inside the deep divider steel cores. This dedicated thermal management prevents heat zones from building up, allowing you to run fast, continuous production cycles without part warping.
Conclusion: Future-Proof Your Houseware Product Lines
Achieving commercial success in the competitive global houseware market requires investing in smart, high-efficiency injection tooling.
Stop losing production profits to warped parts, sticky molds, and deep-grid stress marks caused by unoptimized container designs. Upgrading your production floor to a professionally balanced 4-compartment bento box mold ensures rapid cycle times and flawless cosmetic finishes. We engineer every single tooling layout to maximize your automated factory output and deliver long-lasting durability.




Add comment